Errors encountered on Updating 2012 MacBook Pro to Ventura
***********************************************
References
- https://dortania.github.io/OpenCore-Legacy-Patcher/INSTALLER.html
- Mr.Macintosh How to Install Ventura on Unsupported Macs EASY OCLP GUIDE!
- Eevnos - How To Install Ventura on a 2012 MacBook Pro
***********************************************
Updating 2012 MacBook Pro to macOS Ventura
The decision to update the MacBook Pro 2012 model to macOS Ventura is prompted by Apple's discontinuation of security updates, along with other app providers ceasing updates. This update aims to maintain the device's security and ensure it stays current.
What began as a straightforward task turned into a 5-day endeavor. Despite not being covered in YouTube videos, while troubleshooting various errors, I realized this was an entirely different challenge.
Whenever a new error pops up, the solution involves installing macOS Catalina, updating it to the latest version, and then following the steps again.
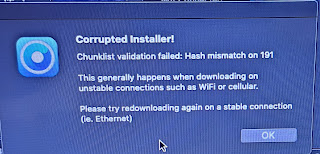
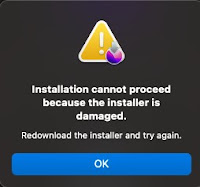
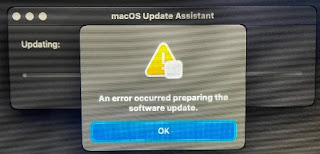
The issues started with an "opencore legacy patcher chunklist validation failed" error. This was followed by a " installation cannot proceed because the installer is damaged". Additionally, an "an error occurred preparing the software update" message appeared.
I'm in the process of listing the errors encountered in the steps. You can find the full details of steps in the links below.
*************EFI Boot Option.
Hold Option+ Power button to enter EFI boot mode
Here are the steps to follow:
1. Create a macOS USB Installer for the original mac-OS Catalina.
2. Download OpenCore legacy Patcher
3. Create macOS Installer
4. Booting OpenCore and macOS
5. OpenCore Legacy Patcher Boot Process
6. Post Installation - Now MacBook Pro 2012 is updated macOS 12.6.8 Monterey
7. Updating Opencore Legacy Patcher to newest version 0.6.8
8. Software Update to macOS Ventura 13.5.1
1. Create a macOS USB Installer for the original mac-OS Catalina.
First, download a copy from the Apple Store, and then proceed with these steps.
- Open the Terminal window.
- Type `sudo` and add space.
- Right-click on the "Catalina" application and choose "Show Package Contents."
- Navigate to Contents -> Resources.
- Drag the "createinstallmedia" file next to "sudo" in the Terminal.
- Type `--volume`.
- Locate the formatted USB drive on your desktop, click and drag it next to `--volume` in the Terminal.
- The command should look like the example shown in the image below.
 |
| macOS USB Installer |
2. Download OpenCore legacy Patcher
Follow these steps:
1. Download the OpenCore legacy Patcher.
2. If you encounter the error "opencore legacy patcher chunklist validation failed" keep in mind that this issue is related to the OpenCore legacy Patcher version you're using.
3. Specifically, version 0.6.6 of the OpenCore legacy Patcher is suitable for MacBook Pro 2012 Catalina.
4. Note that if you attempt to use versions 0.6.7 or 0.6.8, you will likely encounter the "chunklist" error.
 |
| chunklist validation failed |
3. Create macOS Installer
Follow these steps:
1. Download the macOS Installer.
2. Download the associated image.
3. Choose the specific macOS installer version, like macOS 12.6.8.
4. Booting OpenCore and macOS
Follow these steps:
1. Choose the EFI boot option for installation.
2. Select "Install macOS Ventura."
3. If you get the "installation cannot proceed because the installer is damaged" error, it means your current host OS (Catalina) isn't compatible with the chosen macOS version.
 |
| installation cannot proceed because the installer is damaged |
4. I had trouble installing macOS 13.6 Ventura, so I opted for macOS 12.6.8 Monterey instead.
Up to this point, if errors arise, the solution is to reinstall macOS Catalina, ensure it's the latest version, and then begin the steps anew from the beginning.
5. OpenCore Legacy Patcher Boot Process
Here's a simplified version of the steps:
1. Start the OpenCore Legacy Patcher Boot Process.
2. Choose the option with a grey hard disk icon, which might be labeled "macOS Installer" or named based on your disk during installation.
3. If you encounter the "macOS Update Assistant - An Error occurred preparing the software update" message, it's time to reset the Mac's NVRAM and SMC.
 |
| An Error occurred preparing the software update" message |
4. Your Mac will reboot multiple times, and you'll eventually see the macOS setup page. When prompted to sign in to your Apple account, skip this step, as it won't let you accept the terms and conditions.
6. Post Installation
1. Choose "Post-Install Root Patch" and install it on the internal disk where macOS is installed.
2. Next, select "Build and install OpenCore" once again, this time on the internal disk where macOS is installed.
3. Now the Now MacBook Pro 2012 is updated macOS 12.6.8 Monterey.
7. Updating Opencore Legacy Patcher to newest version 0.6.8
8. Software Update to macOS Ventura 13.5.1
1. The Apple software update will find and prompt you to install macOS Ventura 13.5.1.
2. Download the update, and it will automatically install.
3. Open Opencore Legacy Patcher.
4. Choose "Post-Install Root Patch" and install it on the internal disk where macOS is installed.
5. Select "Build and install OpenCore" again, this time on the internal disk where macOS is installed.
Now MacBook Pro 2012 is updated with macOS Ventura 13.5.1
Remember to regularly check for updates to Opencore Legacy Patcher and keep track of the updates you need to install and their bug fixes. These updates are crucial for supporting legacy MacBook Pro devices, as they aren't official Apple images. Stay informed to ensure your system runs smoothly!
**************************************************

Comments
Post a Comment