HomeAssistant
Home Assistant on OMV Container in Raspberry-Pi
DISCLAIMER
- The information provided on this website is intended to provide a basic understanding of certain technologies and is not intended to be a comprehensive guide.
- Therefore, it should not be relied upon as the sole source of information and should not be used as a substitute for professional advice or expert analysis.
- Please exercise caution when visiting or downloading from websites mentioned on this website and verify the safety of the website and software.
- Some websites and software may be flagged as malware by antivirus programs.
- The reader assumes all responsibility for their use of the information contained on this website and any consequences that may arise.
- The author disclaims any liability for any damages or losses that may result from the use of this website or the information contained herein.
- The author reserves the right to update or change the information contained on this website at any time without prior notice.
- Any attempts to perform penetration testing or ethical hacking on systems or networks should be done with the explicit permission of the system/network owner.
- Unauthorized access is illegal and can result in serious legal consequences.
- It is important to fully understand the scope of the testing and to only test within that scope. Testing outside the agreed upon scope is considered unauthorized and may result in legal action.
- Any findings or vulnerabilities discovered during testing should be reported to the system/network owner immediately and kept confidential until a fix can be implemented.
- It is recommended to use a separate, dedicated testing environment rather than testing on a live production system to minimize the risk of accidentally causing damage or downtime.
- It is important to take steps to protect your own identity and prevent accidental data leaks or exposure of sensitive information during testing.
- It is also recommended to follow a standard code of ethics for ethical hacking and penetration testing.
Reference:
- https://www.home-assistant.io/installation/linux
- https://www.home-assistant.io/getting-started/onboarding/
- https://github.com/JurajNyiri/HomeAssistant-Tapo-Control?tab=readme-ov-file
- https://www.hass-agent.io/2.0/getting-started/
- https://hub.docker.com/_/eclipse-mosquitto
- https://github.com/sukesh-ak/setup-mosquitto-with-docker
- https://github.com/NemesisRE/kiosk-mode
- https://github.com/KTibow/fullscreen-card
Home Assistant on OMV Container in Raspberry-Pi :
Installing Home Assistant on Docker using OMV Compose, along with Portainer, Jellyfin, and MQTT. Here’s the breakdown:
Home Assistant on OMV
- Created the Home Assistant compose file
- Completed onboarding and set up integrations
- Added Tapo Cameras and enabled HACS integration
Other Services on OMV
- Installed Jellyfin and Portainer using Docker Compose
- Set up MQTT and connected it to Home Assistant:
- Created the compose file and config
- SSH into the container to add users/passwords
- Added MQTT integration on Home Assistant
Installing HASS.Agent on Windows, connected via API token, and added Windows sensors to Home Assistant.
OMV 7 : OMV-extras

|
| OMV |

|
| search for openmediavault |
Now access Docker Compose under the hamburger menu
|
| Docker compose menus appearing |

|
| shared folder |

|
| share folders added to compose settings |

|
| Creating a User for Docker |
Home Assistant on OMV Container

|
| HA:OMV dashboard |
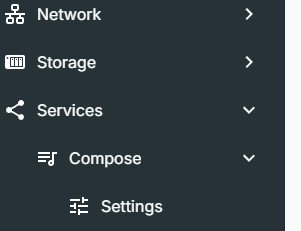
Step 01: homeassistant Compose file on OMV
OMV->Services->Compose->Files->add
----
services:
homeassistant:
image: ghcr.io/home-assistant/home-assistant:stable
container_name: homeassistant
network_mode: host
environment:
- PUID=1001
- PGID=100
- TZ=Etc/UTC
- /run/dbus:/run/dbus:ro
volumes:
- /data/homeassistant/data:/config
- /run/dbus:/run/dbus:ro
ports:
- 8123:8123 #optional
restart: unless-stopped
-------
Once the container is up and running, following the onboarding steps.
Step02: On-boarding
https://www.home-assistant.io/getting-started/onboarding/
Step03: Integrations
How to Add Tapo Cameras
https://github.com/JurajNyiri/HomeAssistant-Tapo-Control?tab=readme-ov-file

|
| HA:CCTV dashboard |
Step1:
Enabling Third party support in the Tapo app.
Me->Tapo lab->Third-party-compatibility
Step2
For each camera, need to enable camera username and password
Step 3:
Adding -> TP-Link integration in Home Assistance
Step 4:
For live streaming, use Onvif Integrations
Give IP address of the camera and port as 2020
Step 04: Hacs-integration
Installing hacs-integration

|
| Hacs-Integration |
https://hacs.xyz/docs/use/download/download/#to-download-hacs-container
pi@piraspi:~> sudo docker exec -i -t 1c4f56c6fe802 bash
wget -O - https://get.hacs.xyz | bash -
*******************
Jellyfin Compose file on OMV
services:
jellyfin:
image: jellyfin/jellyfin
container_name: jellyfin
network_mode: 'host'
environment:
- PUID=1001
- PGID=100
- TZ=Etc/UTC
volumes:
- /data/config:/config
- /data/cache:/cache
- /srv/dev-disk-by-uuid-765gvy/GNAS:/data/movies
- type: bind
source: /srv/dev-disk-by-uuid-65765tvh/GNAS
target: /media
read_only: true
restart: 'unless-stopped'
extra_hosts:
- 'host.docker.internal:host-gateway'
**************
Portainer Compose file on OMV
services:
portainer:
image: portainer/portainer-ce:latest
container_name: portainer
restart: unless-stopped
volumes:
- /etc/localtime:/etc/localtime:ro
- /var/run/docker.sock:/var/run/docker.sock:ro
- /data/portainer/data:/data
ports:
- 9000:9000
environment:
- PUID=1001
- PGID=100
**********************
MQTT docker container and connecting to Home assistant

|
| MQTT Integration |
Step 01: Compose file
services:
mqtt:
image: eclipse-mosquitto
container_name: mqtt
network_mode: 'host'
environment:
- PUID=1001
- PGID=100
- TZ=Etc/UTC
volumes:
- /data/mosquitto/config: /mosquitto/config
- /data/mosquitto/data: /mosquitto/data
- /data/mosquitto/log: /mosquitto/log
restart: unless-stopped
ports:
- 1883:1883
- 9001:9001
***
Step 02: Docker pull command creating config file
pinas$:/data/mosquitto/config $ sudo nano mosquitto.conf
persistence true
persistence_location /mosquitto/data/
log_dest file /mosquitto/log/mosquitto.log
listener 1883
## Authentication ##
allow_anonymous true
Step 03: ssh into container and adding user/password
Portainer: Containers mqtt Console:/bin/sh

|
| Portainer:ssh |
#mosquitto_passwd -c /mosquitto/config/password.txt mqttuser1
Password:
retype Password:
Step 04: Adding user/password file path to config file.
pinas$:/data/mosquitto/config $ sudo nano mosquitto.conf
persistence true
persistence_location /mosquitto/data/
log_dest file /mosquitto/log/mosquitto.log
listener 1883
## Authentication ##
allow_anonymous false
password_file /mosquitto/config/password.txt
then, Restarting the container.
Step 05: Adding MQTT integration on HA
Input the server ip, Mqtt username and password which was created.

|
| MQTT Integration |
Step 06: Installing Hass.Agent for Windows
https://www.hass-agent.io/2.0/getting-started/

|
| Hass.Agent for Windows |
Step 07: Getting API token from Home Assistant
Click profile name -> /profile/security -> scroll bottom click "Long-lived access tokens"

|
| API token from Home Assistant |

|
| Final Hass Agent for windows |
Step 08: Adding Hass.Agent integration on HomeAssistant

|
| Device Discovered on HA |
Step 09: Adding Sensors on HASS.Agent on windows to reflect on HA

|
| Adding Sensors |

|
| MTTQ HA Dashboard |
***************************
KIOSK-Mode
Home Assistant Calendar Integrations:
SunRise and SunSet Calendar:
Step-01: Using the below weblink one can create Google Sunrise and Sunset calendar.
- https://gearside.com/google-daylight-calendar/
- https://www.php.net/manual/en/timezones.europe.php
- https://gearside.com/calendars/daylight.php?lat=52.950001&lng=-1.150000&timezone=Europe/London
Step-02: Go to google calendar -> Settings -> Add Calendar -> add the URL
 |
| add the URL |
Enabling Google Calendar API:
Step-03: https://www.home-assistant.io/integrations/google/
 |
| enabling API |
Next Step-04 click "Create Credential" -> QAuth Client ID

 |
| Type as -> "TVs and Limited input devices |
 |
| Client ID and Client secret |
Next Step-05 Adding Google calendar integration on Home Assistant:
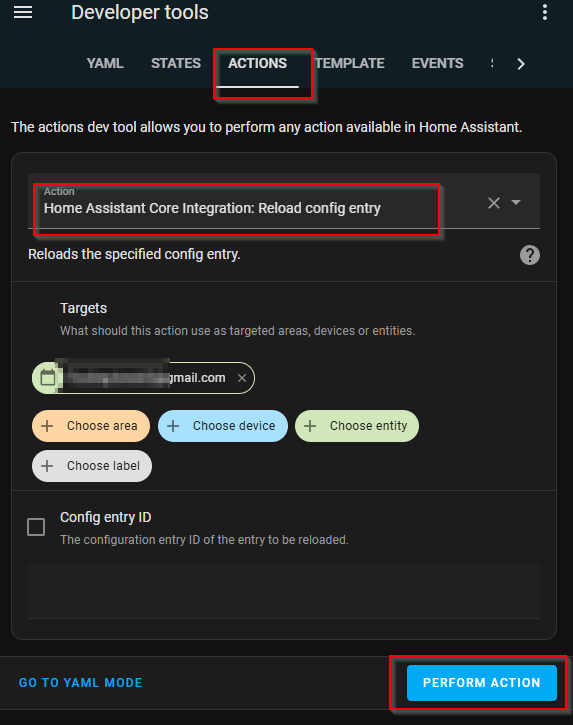
|
| Refreshing calendar |
Step-06: Creating New calendar on Google Account
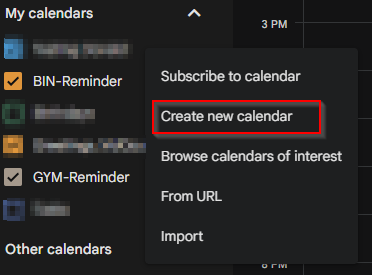 |
| Creating New calendar |
 |
| Naming New calendar |
Step-07: Adding Trash Card Reminder card:
 |
| Trash Card Reminder card |
 |
| custom date format |
 |
| detection pattern |

|
| Calendar Dashboards |
OpenHardWareMonitor Integration
Step 01: OpenHardWareMonitor is running on windows machine,
Step02: Now need to edit configuration.yaml file of the HomeAssistant
To edit file inside the docker, get the volume addressed mapped on docker.
 |
| To edit file inside the docker |
Step03: Restarting the HomeAssistant
 |
| OpenHardwareMonitor Entities |
Configuring Telegram integrations:
Step01: Creating a Bot on your account
- https://core.telegram.org/bots#how-do-i-create-a-bot
- https://t.me/BotFather
Step02: Use the Bot account to get user id
- https://t.me/getidsbot
Step03: Update the configuration.yaml file

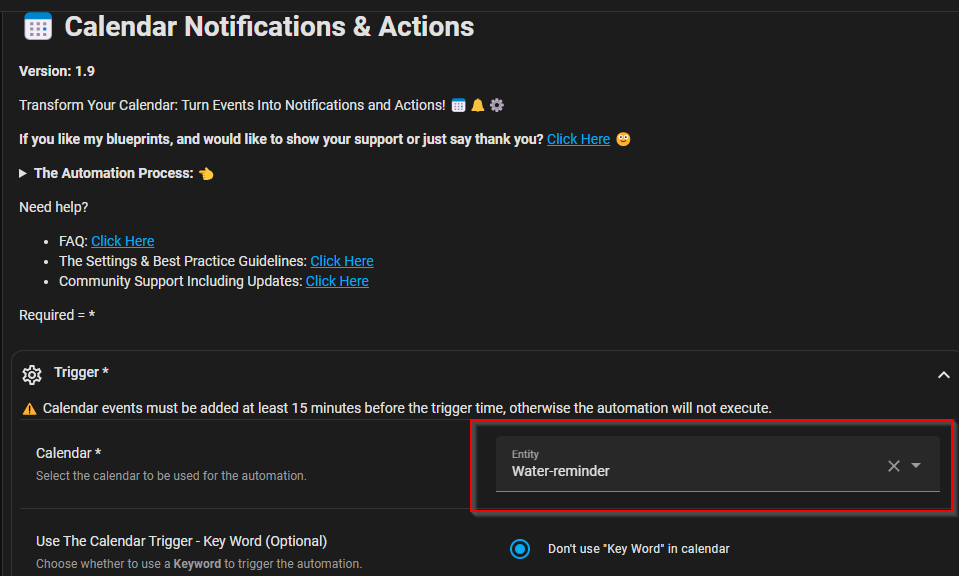 |
| Blue Print setup |
 |
| adding telegram trigger |
 |
| Telegram output |
Tracking Linux System info using glances
Step 01; Installing
Step 02: Running on BackGround:
- Creating a file glances.service at /etc/systemd/system/
- Next enabling in systemctl
- Checking the browser on :
Step 03: Adding Glances to Home Assistant
- https://github.com/nicolargo/glances/wiki/Start-Glances-through-Systemd
- https://github.com/nicolargo/glances/issues/2673
- https://www.home-assistant.io/integrations/glances/


Comments
Post a Comment